

- The Cross section tool, on the right side of the map, is there for everyone.
- The section itself opens at the bottom of the map with a paid plan. Without one, the panel asks you to sign in or choose a plan.
Build a section
1
Click Cross section
Click Cross section on the right side of the map, above Ask, or press X. The section panel opens at the bottom of the map, and the map now takes clicks for the section: clicking a well won’t open its popup or card until you’re done.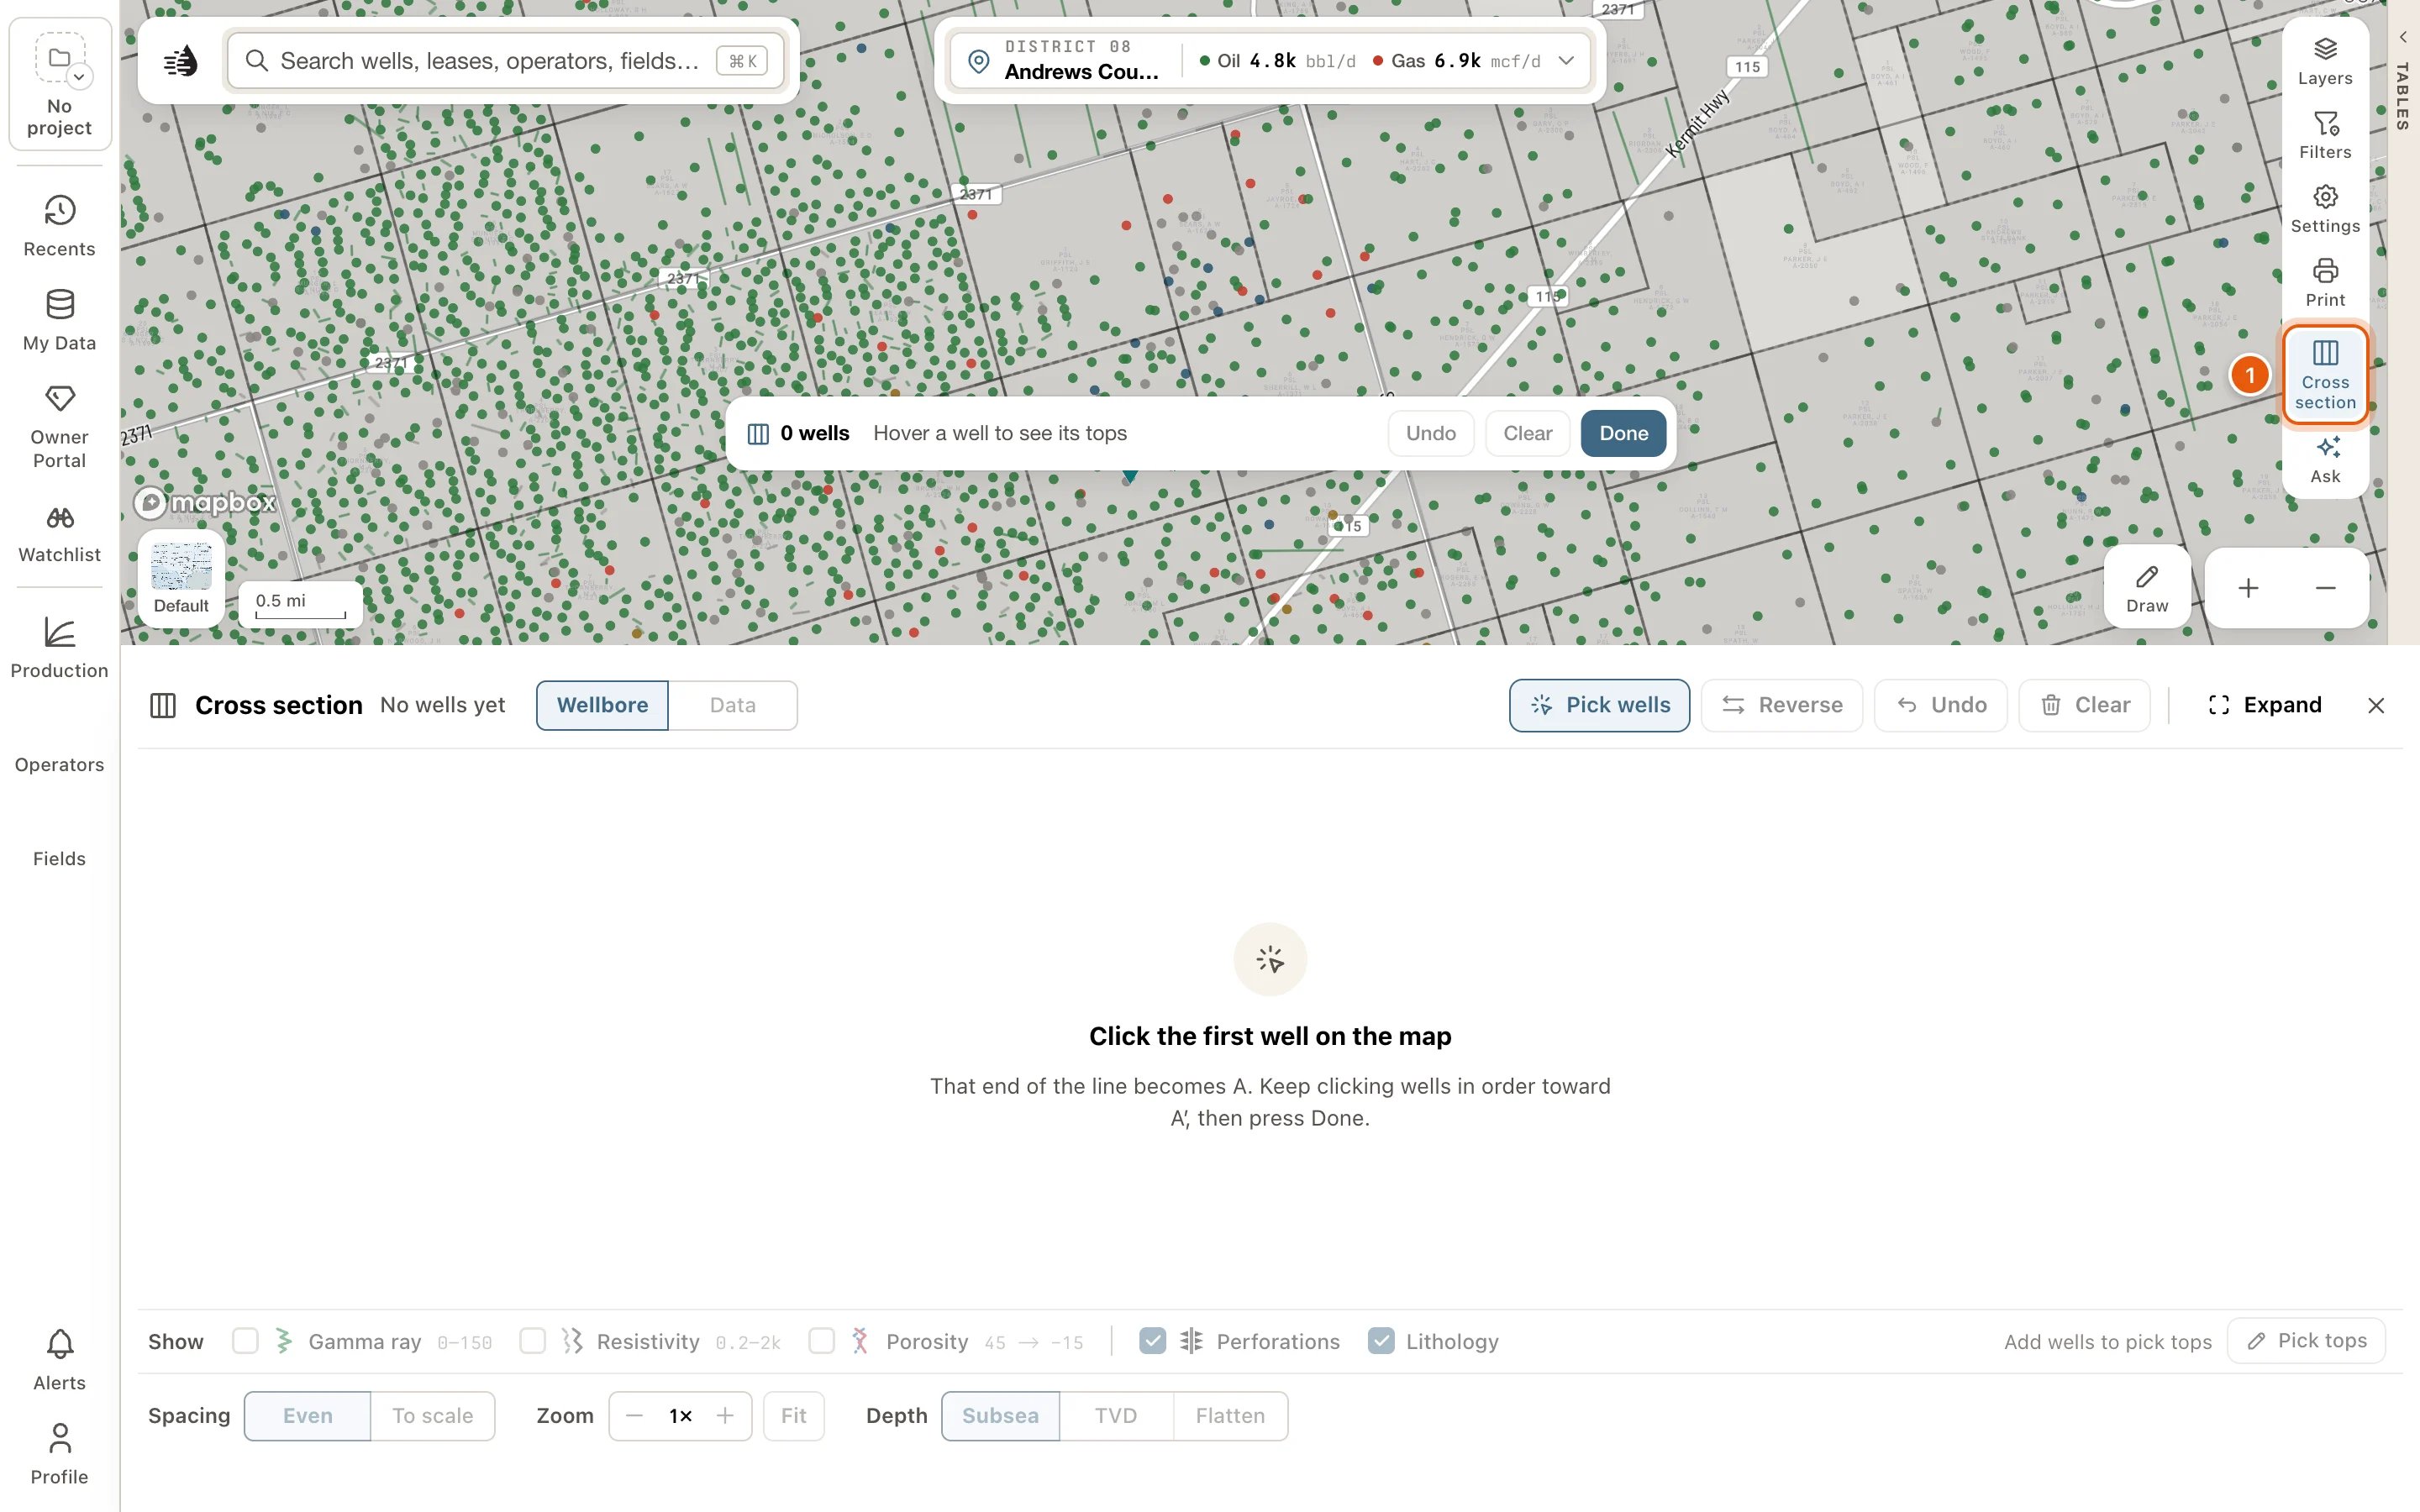
2
Click wells from A to A′
Click the first well: that end of the line is A. Keep clicking wells in order toward A′.Before you click, point at a well. The bar at the bottom of the map says how many tops it has, from which formation to which, and its total depth, or Nothing on file, so you can pass over a well that would draw empty.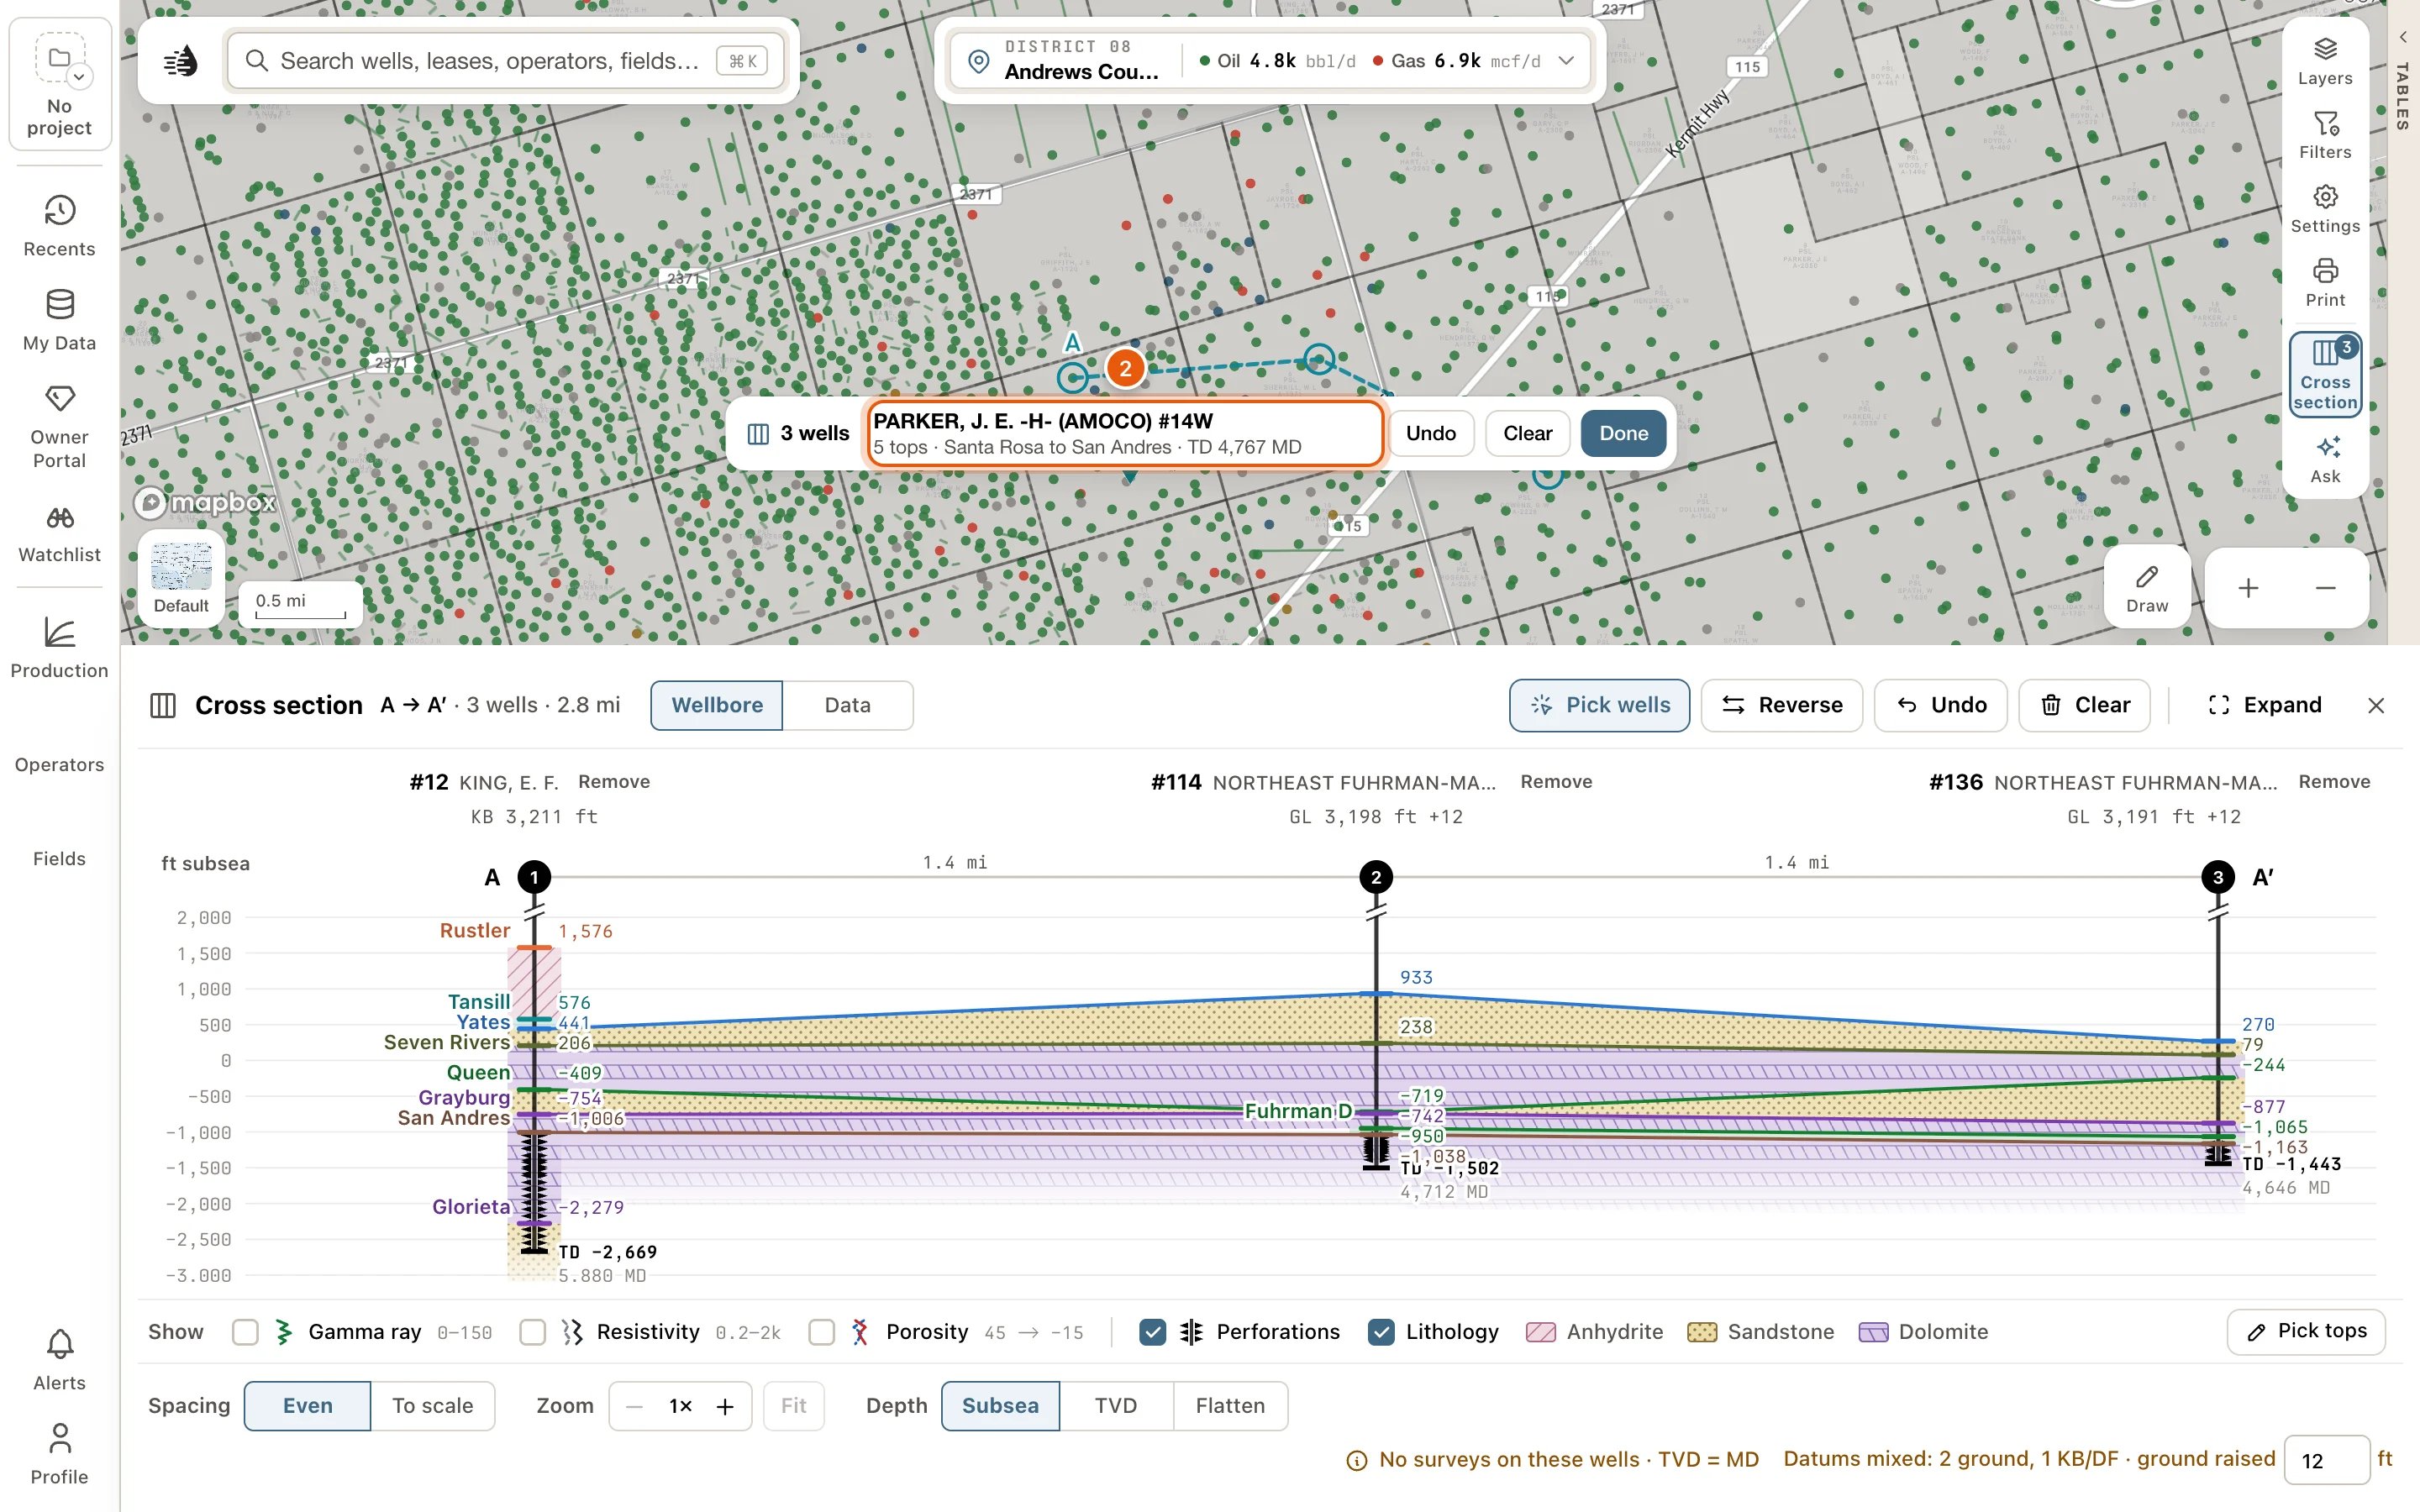
3
Click Done
Click Done in the bar, or press Esc. The map goes back to normal, and the section stays in the panel.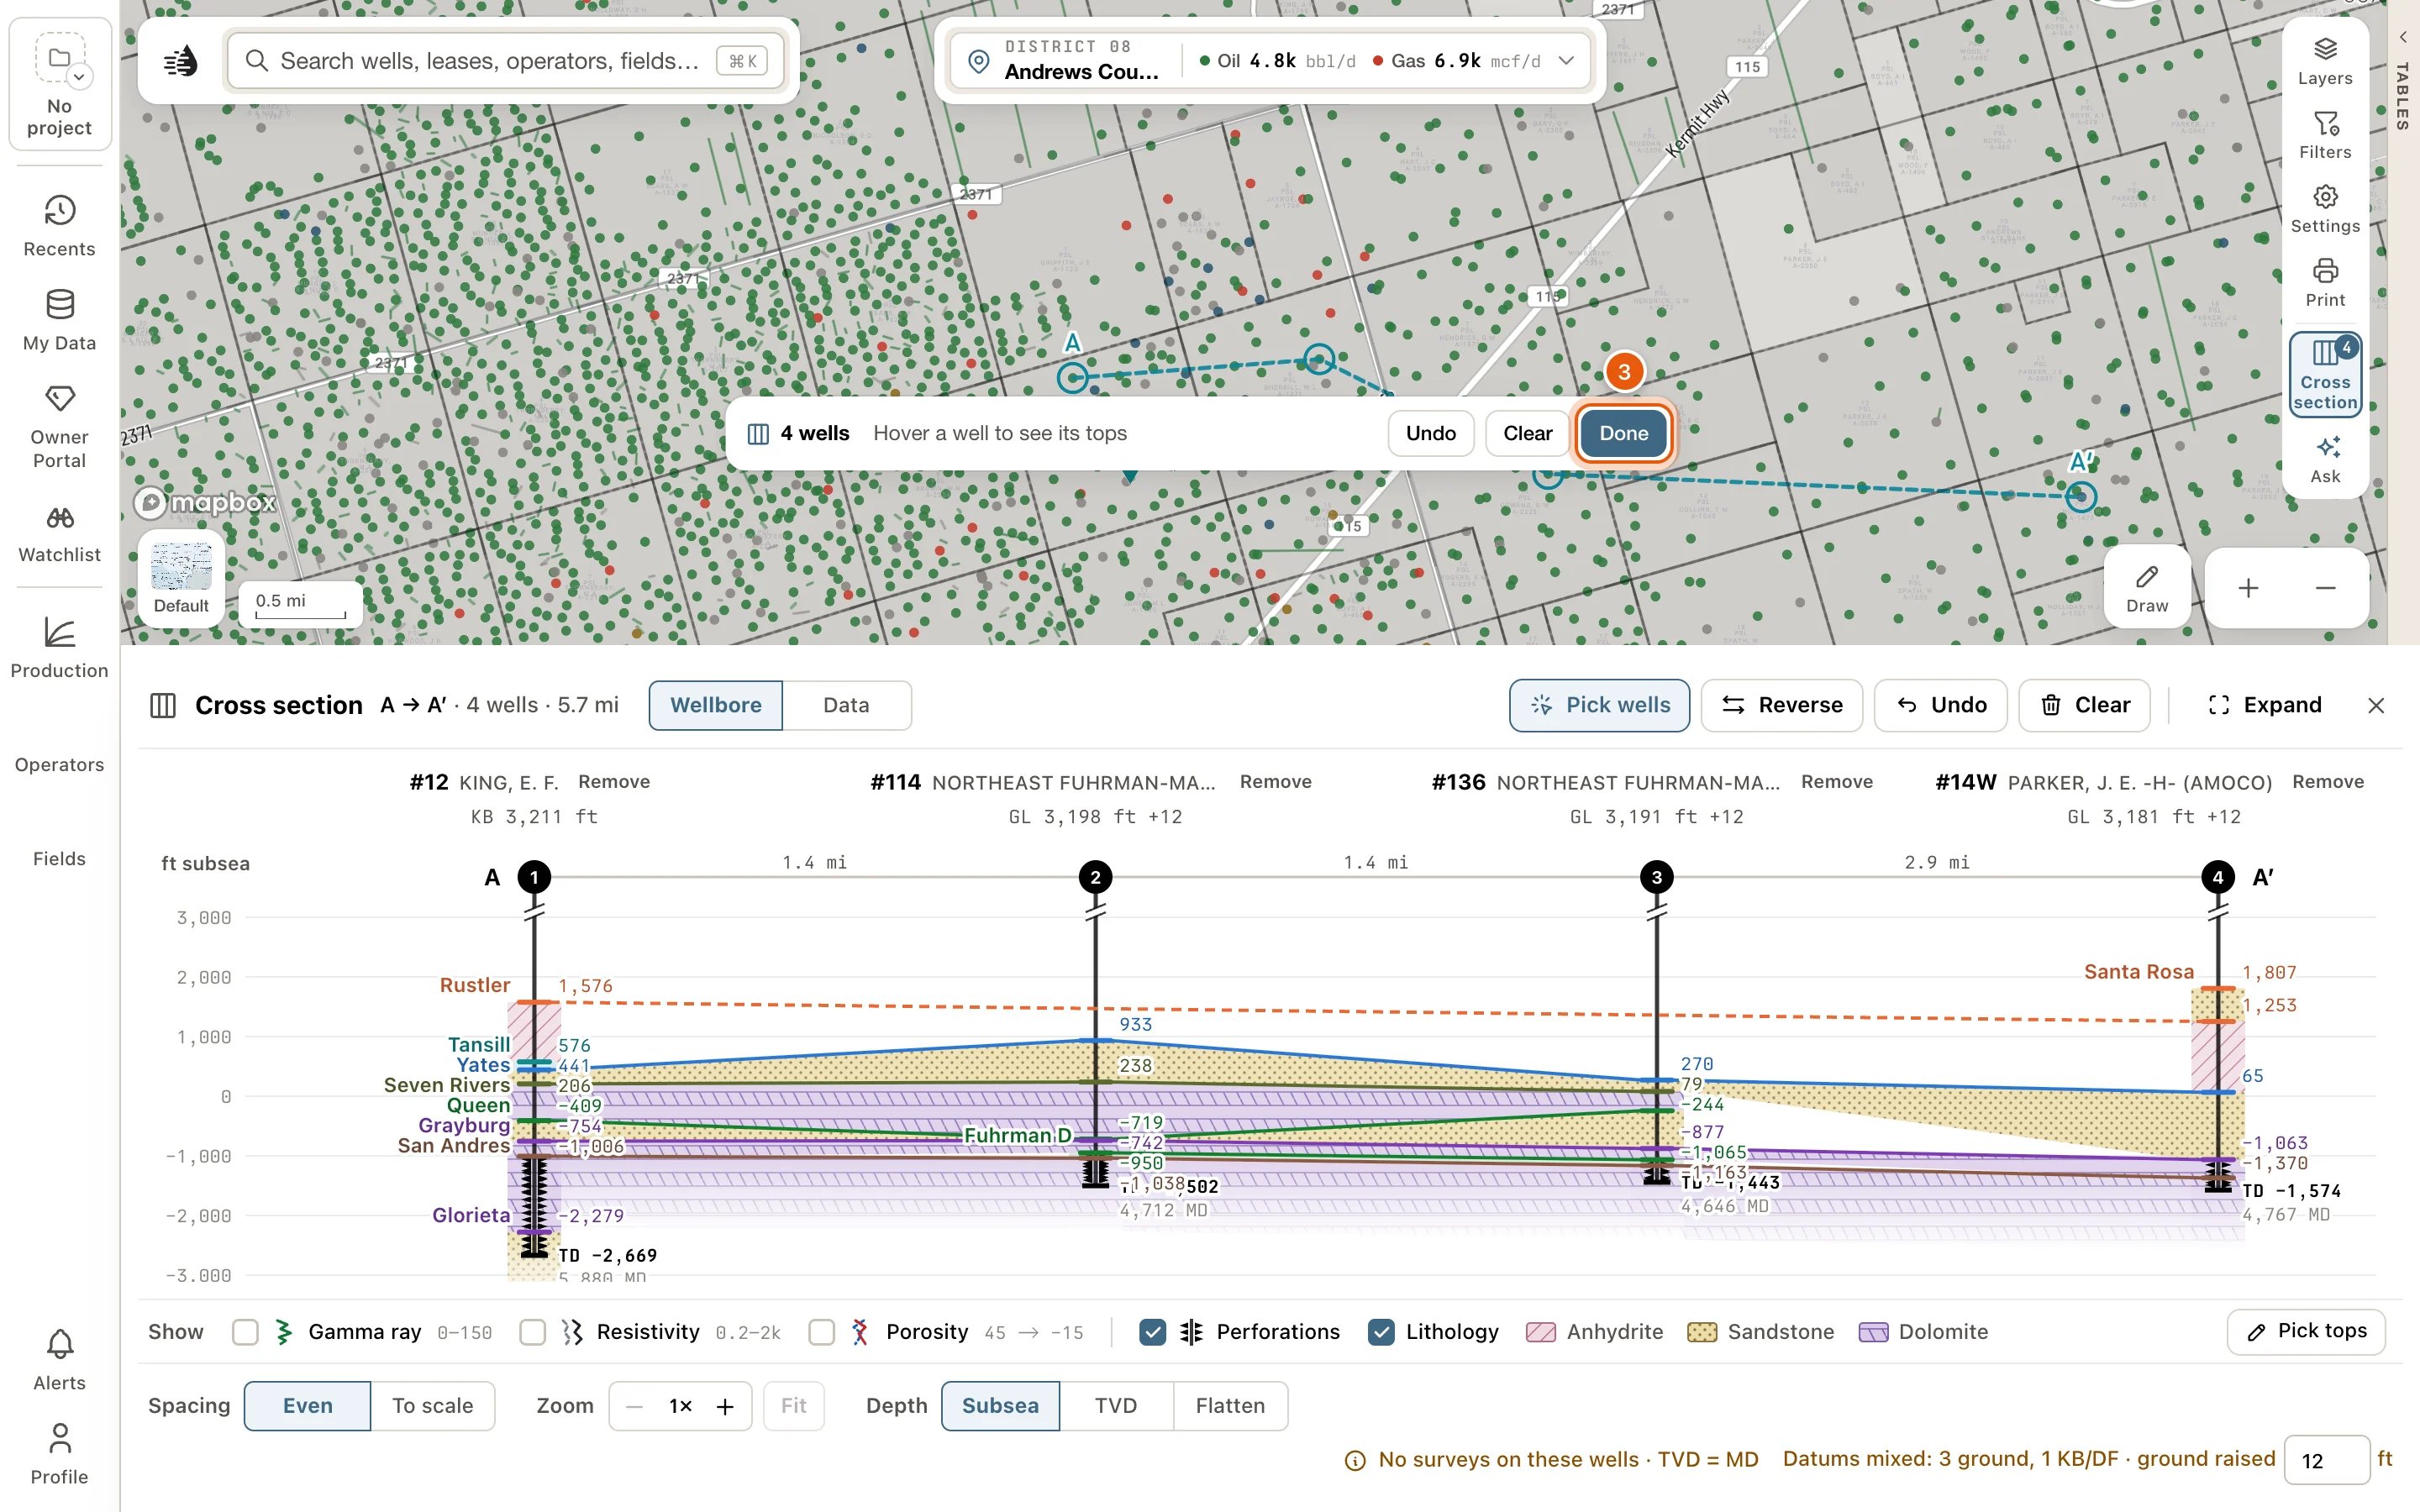
4
Flatten on a top
To line the wells up on one formation, click its top in the section, or choose Flatten beside Depth at the foot of the panel and pick the formation after on.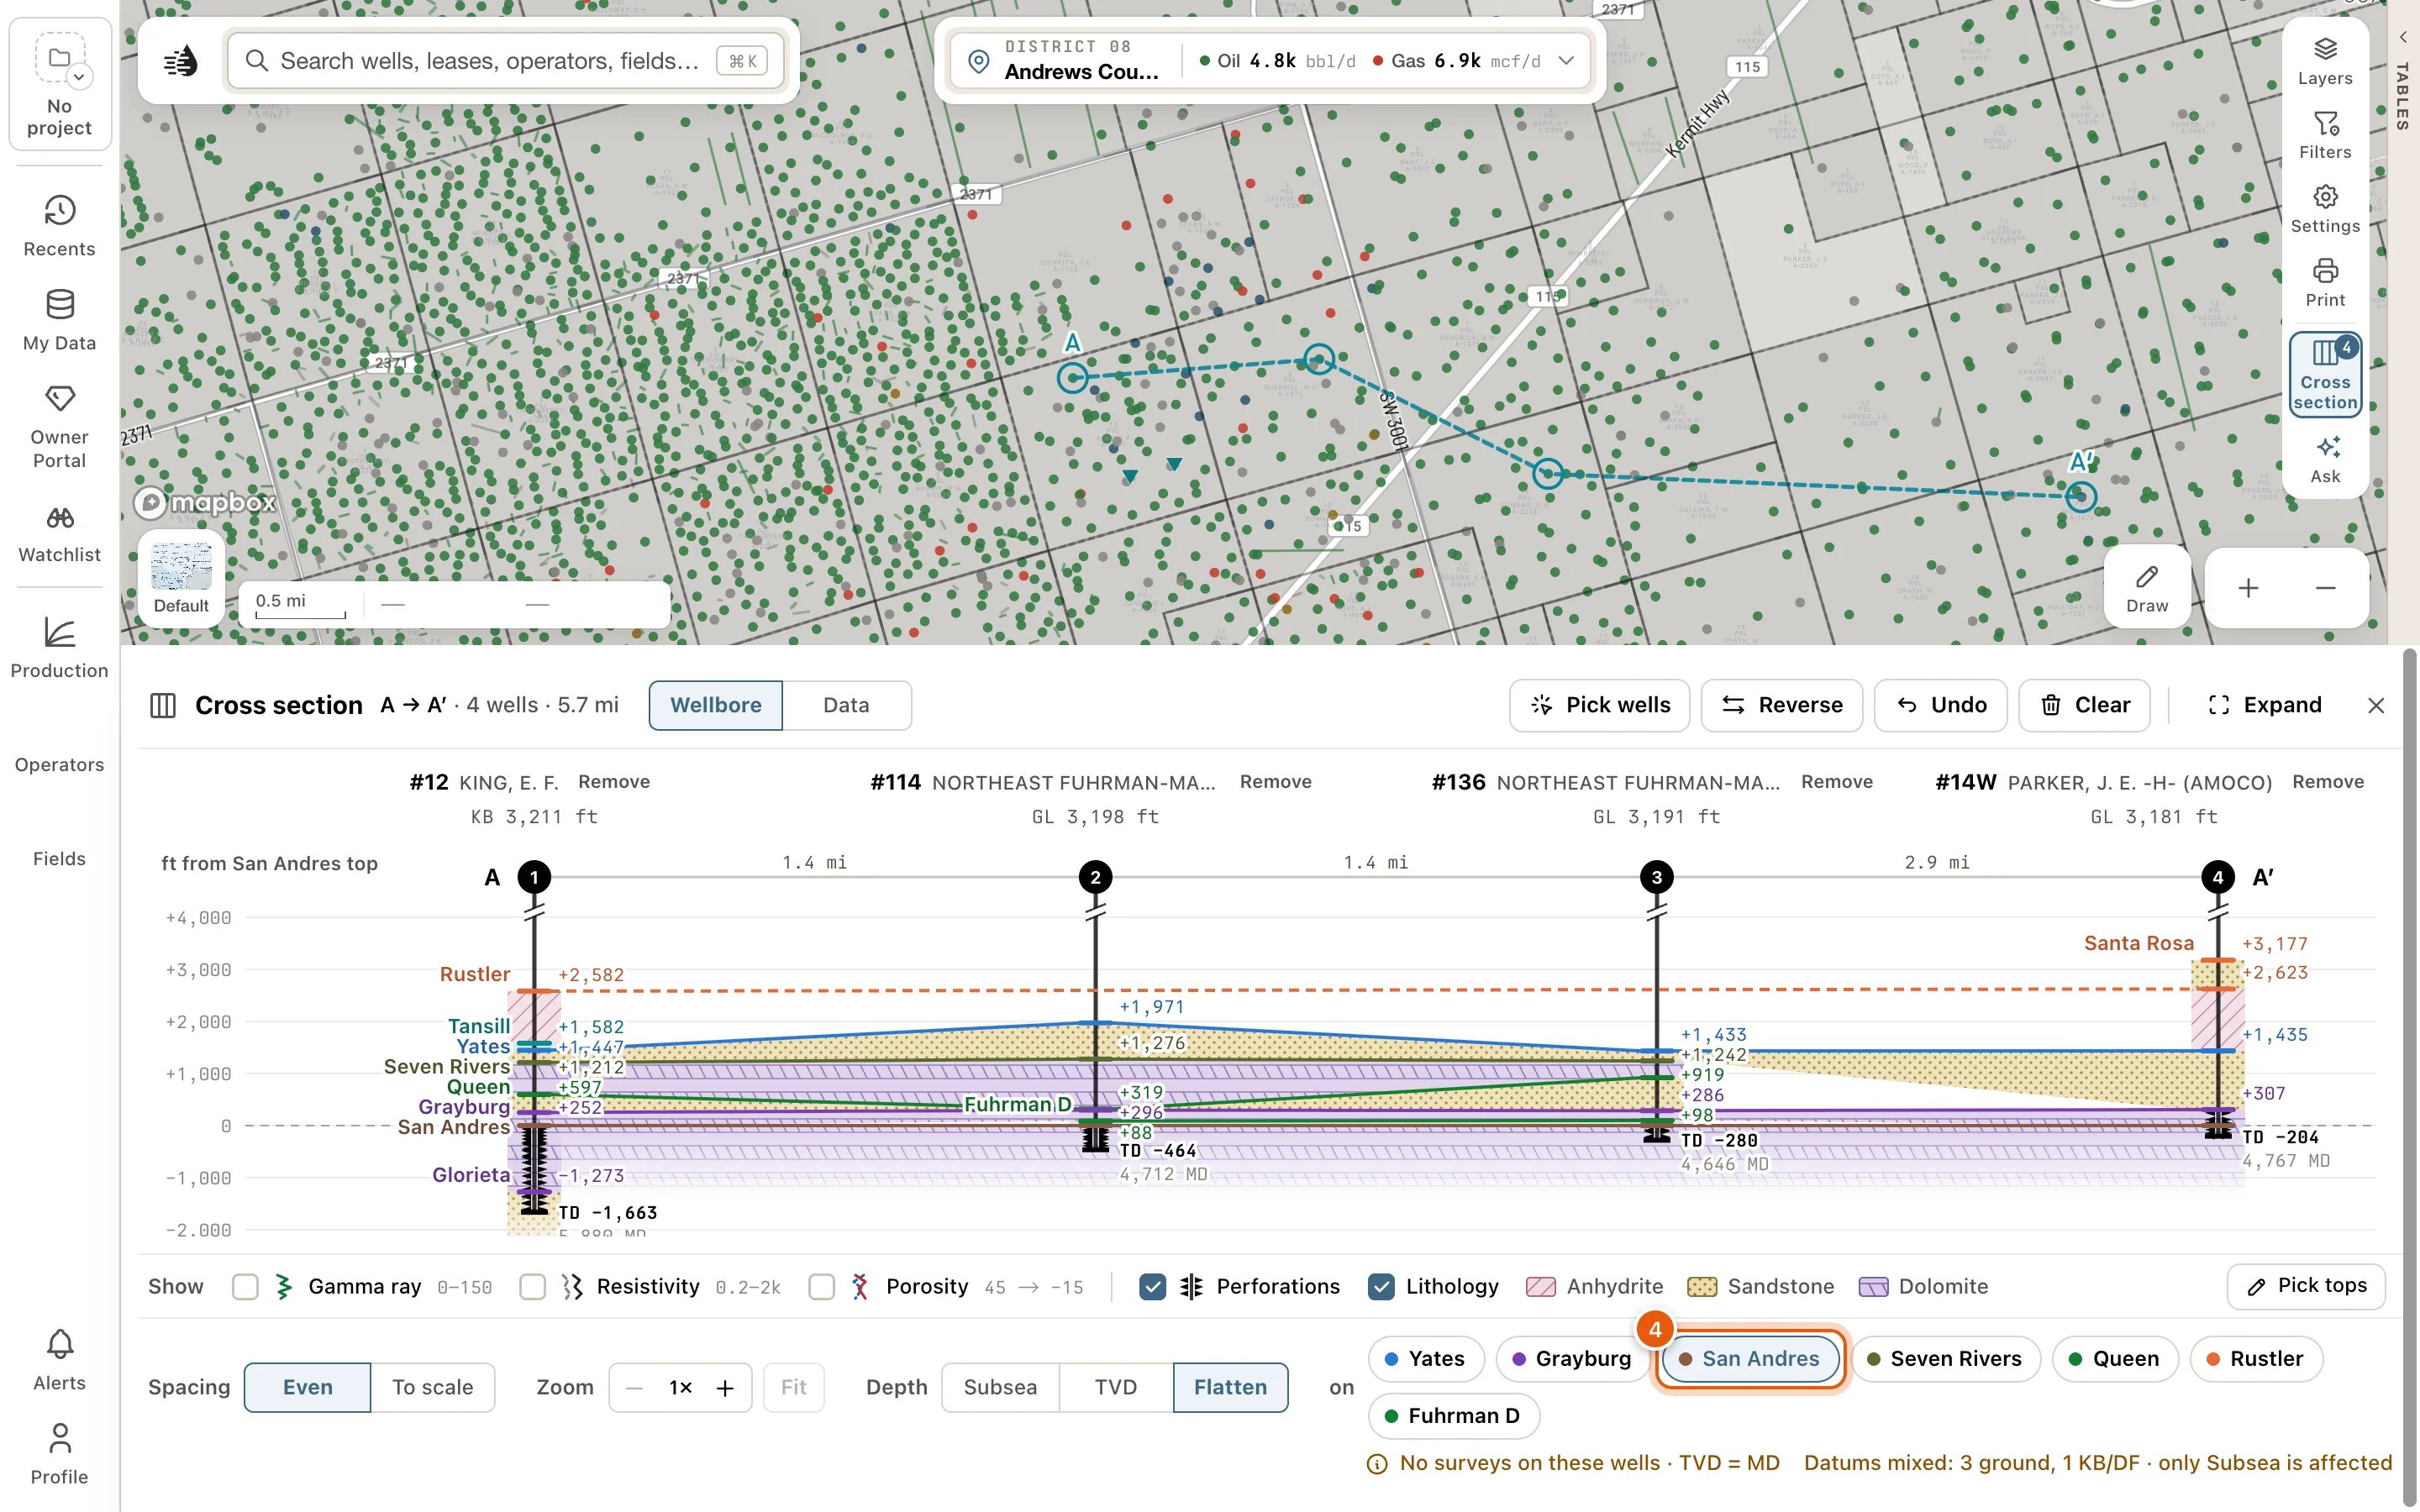
Picking wells
While Cross section is pressed:- Clicking a well adds it to the section. Clicking it again takes it out.
- The wells in the section are ringed on the map, with a dashed line from A to A′.
- The number on the Cross section button counts the wells.
- The bar at the bottom of the map has the well count, the preview of the well under the pointer, Undo, Clear, Show section (when the panel is shut) and Done.
The section panel
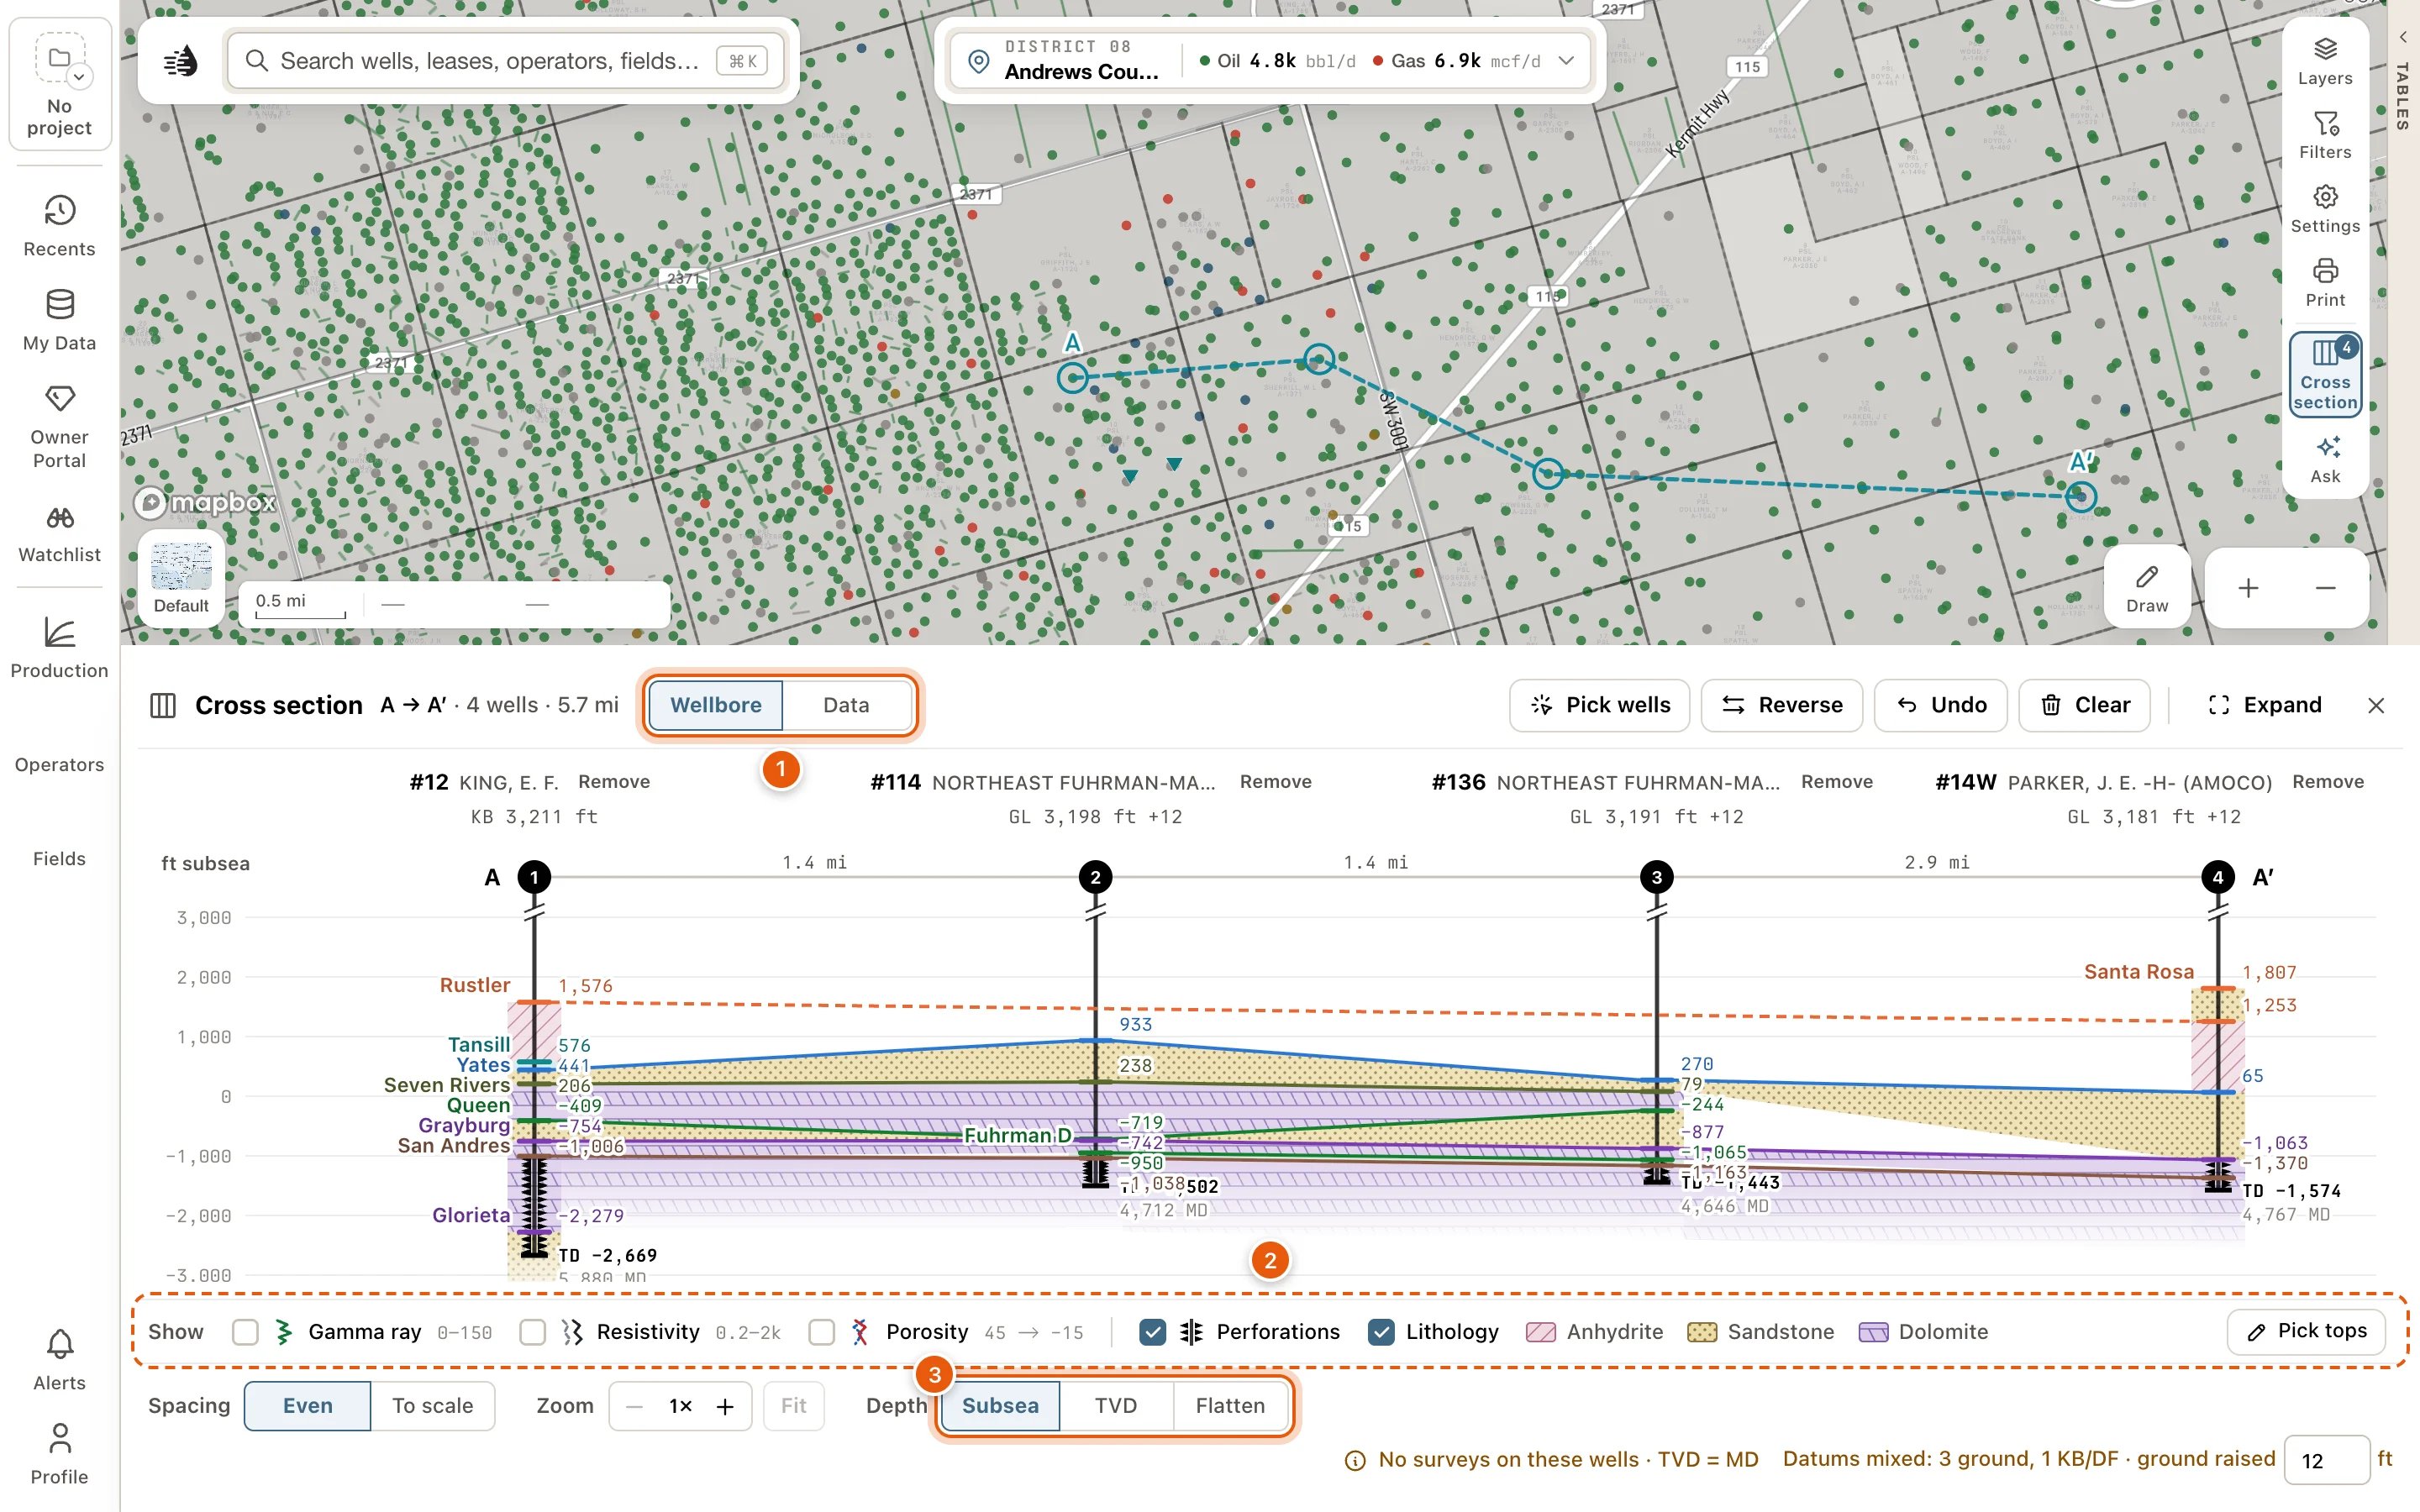
The panel’s top line says what you have: A → A′ · 5 wells · 3.2 mi, or No wells yet.Reading the section
- Across the top, the well strip gives each well’s number and lease, with its datum (like KB 2,746 ft) under it, or what’s wrong with it. With a log track on, that line adds what the well’s log carries, such as KB 2,746 ft · GR · Res. Click a well’s name to open its card. Remove, beside the name, takes the well out of the section, and Undo puts it back.
- Under it, the ruler has the wells’ numbered markers, the distance between neighbours, and A and A′ at the ends.
- Each bore runs down to total depth. Perforations are triangles on the bore, and a drill-stem test is a Z across its interval. Point at either for its depths.
- Each formation is named once, where its line starts, and each well shows its depth. A formation fills its stretch of the bore down to the next top, and is carried to the next well as one layer.
- The well whose column you’re pointing at lights up on the map.
- Point at a formation, and its depth at every well in the section is written beside the well on the map.
Data
Data lists each well’s facts under its own name: the distance from the last well, its datum, total depth, the digital logs QuickScout holds for it, whether it has a directional survey, the depth of each top, and the same facts as Compare. Your compare list isn’t touched.The Show row
The row under the section chooses what the bores carry. Each check has its mark beside it, so the row is the key too.- Gamma ray, Resistivity and Porosity draw log tracks beside every bore, each with its scale: gamma ray on the left (0–150), resistivity (0.2–2k) and porosity (45 → −15) on the right. They draw from a digital log QuickScout holds for the well. Where the density log reads more porosity than the neutron, the porosity track is shaded between them.
- Perforations, drawn as triangles on the bores.
- One check for each kind of well record the section holds, such as DST or Core. See Well records on the section.
- Lithology fills each formation with its rock’s pattern, and lists the rocks it uses. No rock on file for these tops means QuickScout has no rock for them yet. With Gamma ray on, it also fills the gamma ray curve: shale where it reads 75 API and up, and the formation’s rock elsewhere. See Set the rock.
- Pick tops, at the right end. See Pick tops.
The foot
- Spacing: Even spaces the wells evenly. To scale spaces them by the distance between them. It needs three or more wells.
- Zoom: + (Zoom in) and − (Zoom out) stretch the depth, up to 8×, and Fit shows the whole depth again. Zoomed in, scroll or drag the section to move up and down.
- Depth: Subsea hangs the wells by depth below sea level. TVD hangs them by true vertical depth from each well’s own datum. Flatten hangs them on one formation’s top, chosen from the chips after on: the tops two or more wells share.
- No surveys on these wells · TVD = MD: none of the wells has a directional survey, so measured depth stands in for true vertical depth.
- Datums mixed: 2 ground, 3 KB/DF · ground raised 12 ft: some wells’ depths are measured from the ground and some from the drilling floor. On Subsea, the ground ones are raised by the number in the box, 12 ft unless you change it. A well with both heights on file uses its own. On TVD and Flatten, the note says only Subsea is affected.
Flatten, reorder and set the rock
Flatten the section
Click a formation’s top, or its name, in any well. The section hangs on it, level across every well. Click it again to stop. This works for tops that two or more wells share. Pointing at one fades the others.Move a well along the section
Drag a well’s name in the strip, or its column in the section, sideways. The section is laid out as it will be while you drag, and the well stays where you let go. Esc puts it back. Once you’ve clicked a well’s name, or moved to it with Tab, Move left and Move right appear under it. Each moves the well one place toward A or A′. From the keyboard, Alt + ← or → on the well’s name does the same.Set the rock
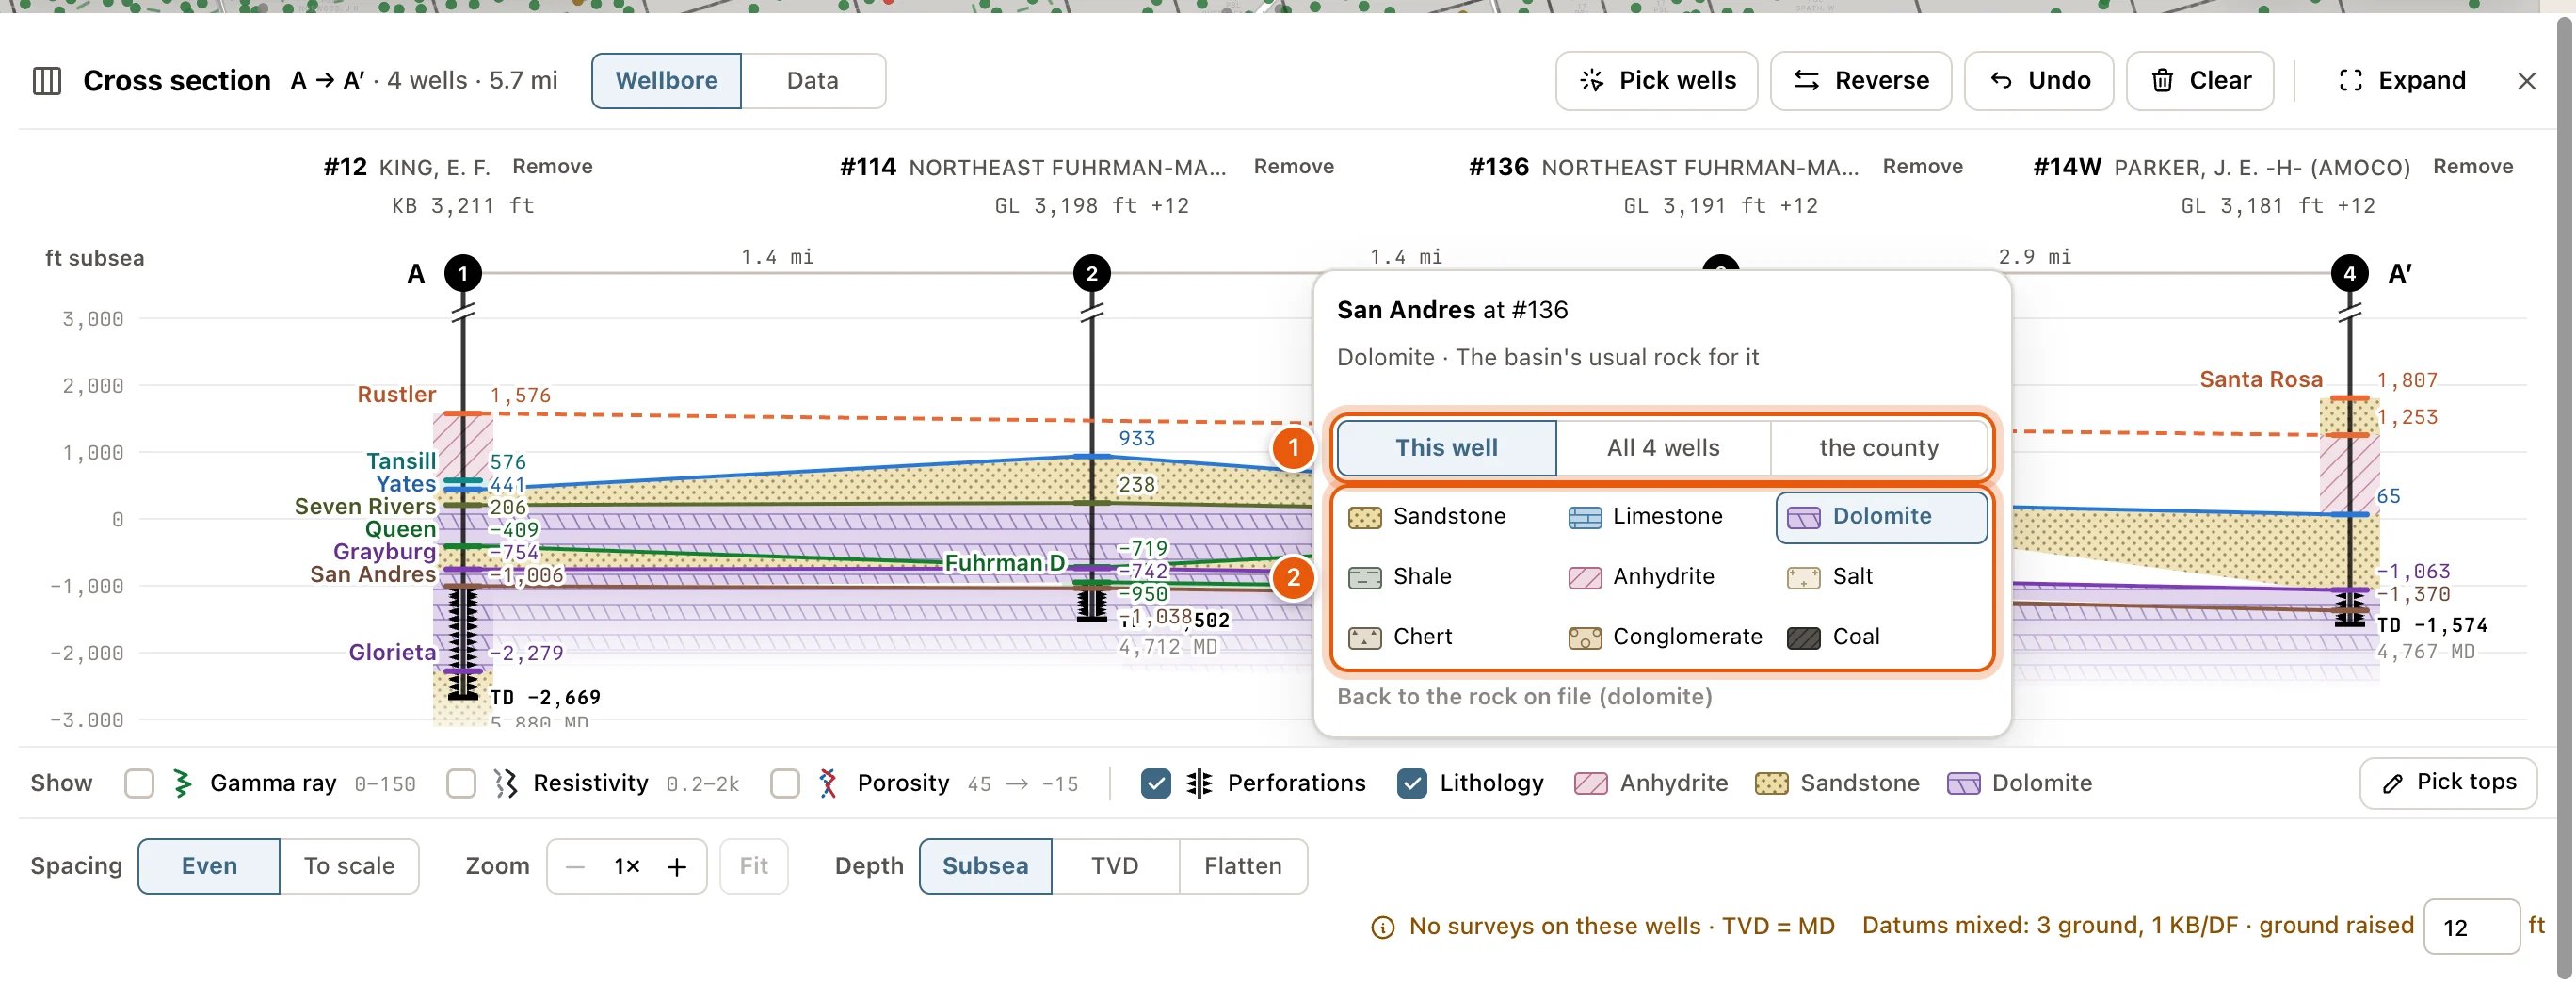
Click a formation’s layer in the section (not its top line) to open its rock. The picker says what the rock is now and where that came from, such as Limestone · From the formation’s name.- Choose where to set it: This well, All 5 wells (every well in the section with the formation), or the well’s county, like Andrews County.
- Click a rock: Sandstone, Limestone, Dolomite, Shale, Anhydrite, Salt, Chert, Conglomerate or Coal.
Pick tops
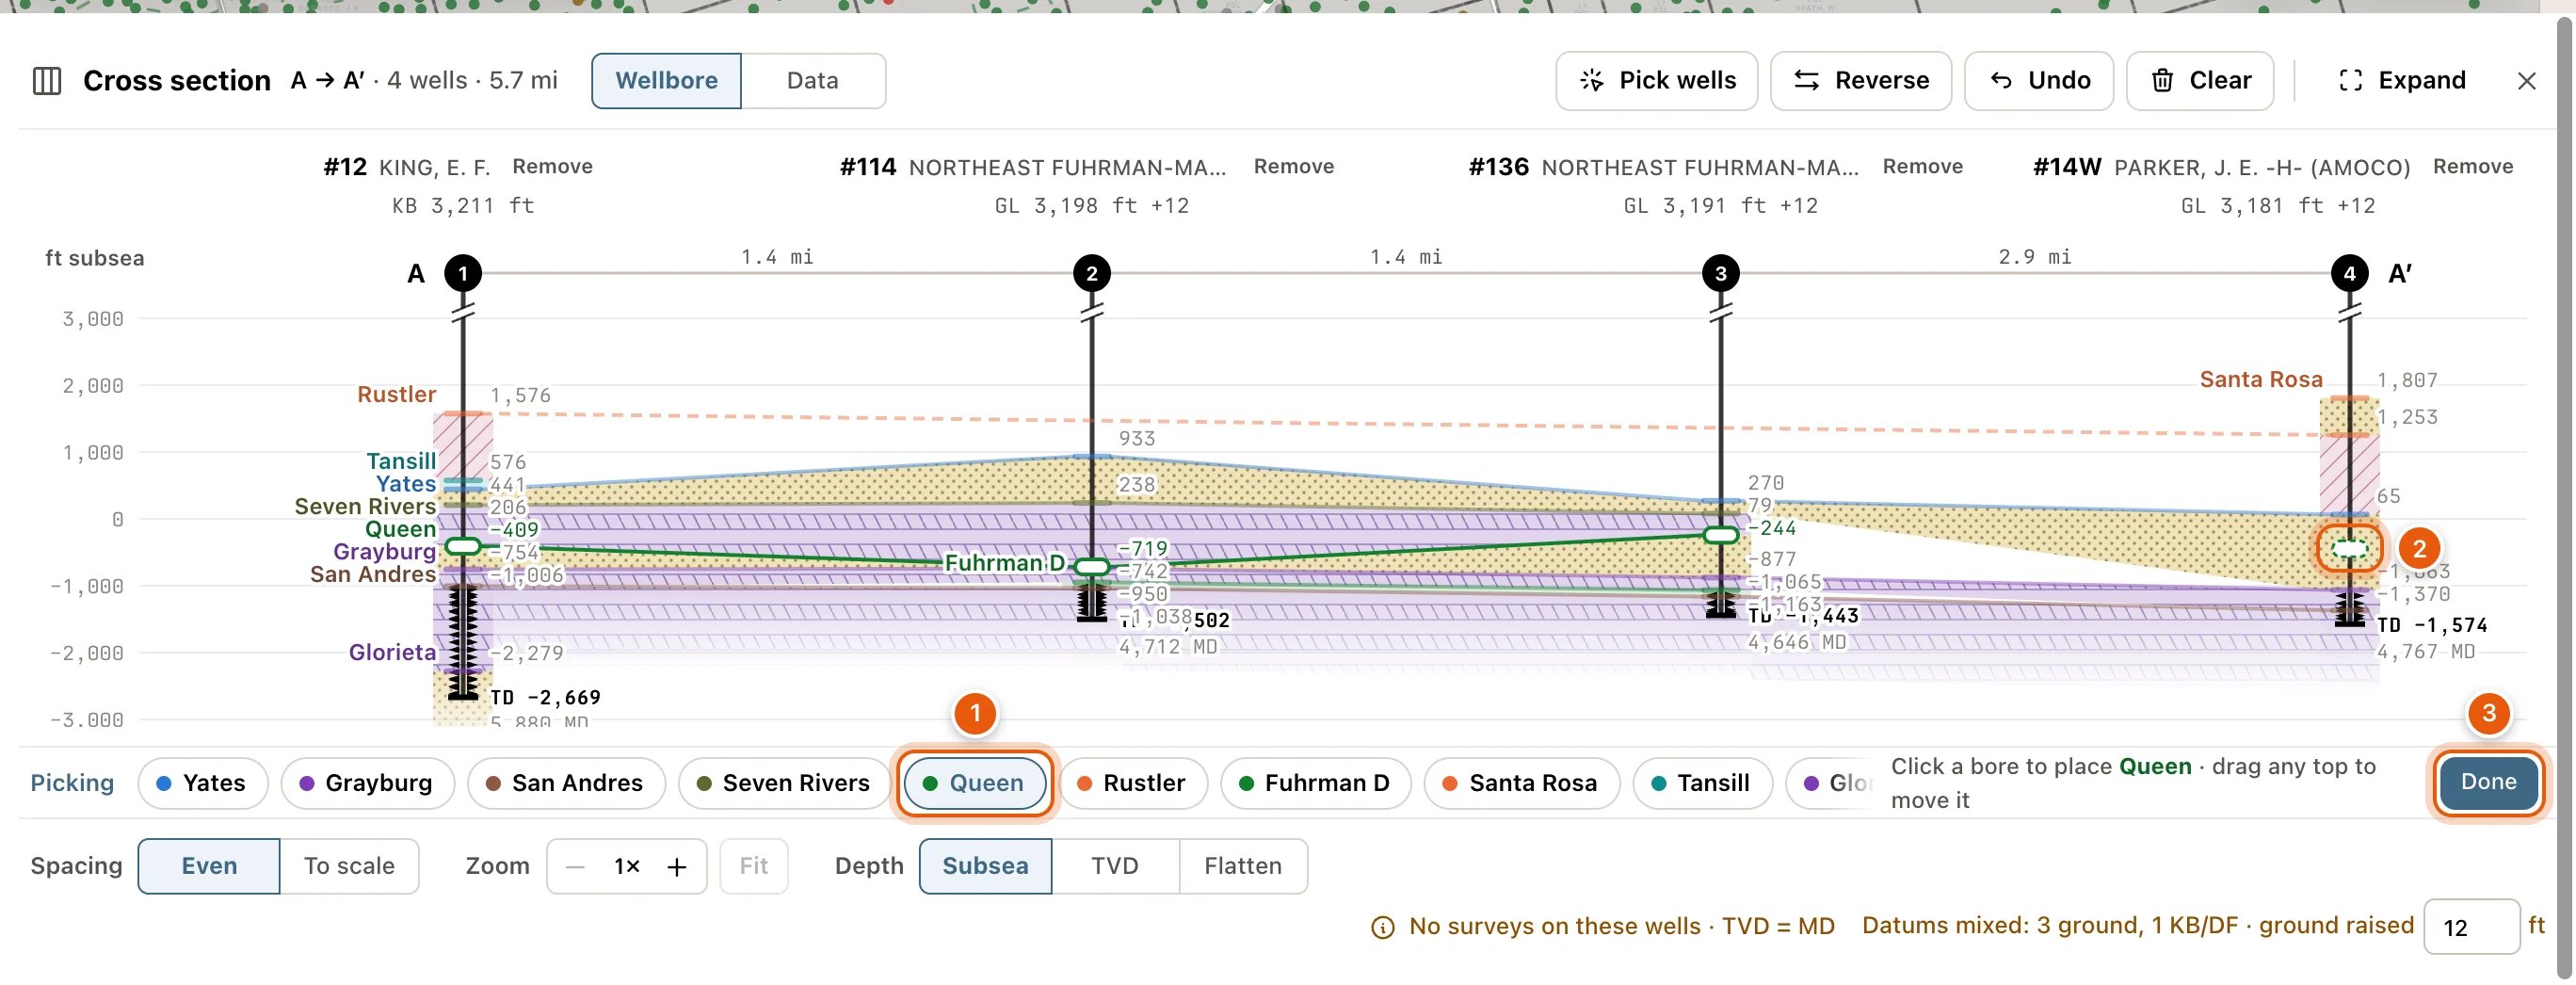
Pick or move formation tops right on the section. The tops you pick are yours: your team sees them, and they show on the well’s card and on the Formation tops layer. Click Pick tops at the right end of the Show row. The row becomes the picking row: Picking, a chip for each formation in the section, Add formation and Done. Until you choose a formation, the hint says Choose a formation, then click a bore.- Click a formation’s chip. The hint says Click a bore to place ‹formation› · drag any top to move it.
- Click a well’s bore where the top belongs. The pick lands on the level line. With log tracks on, you can click anywhere across a well’s tracks, so you can pick the top on its log.
- Drag any top to move it. Dragging the RRC’s or a teammate’s top leaves theirs on file and makes a pick of yours where you let go.
To pick a formation the section’s wells don’t have yet, click Add formation and type in Find or name a formation. NEAR THIS SECTION lists formations picked in wells nearby, and YOUR FORMATIONS your own. A name that isn’t on either list can be added as a new formation.
- Sign in to pick tops
- Switch to Wellbore to pick tops: you’re on Data.
- Add wells to pick tops
Well records on the section
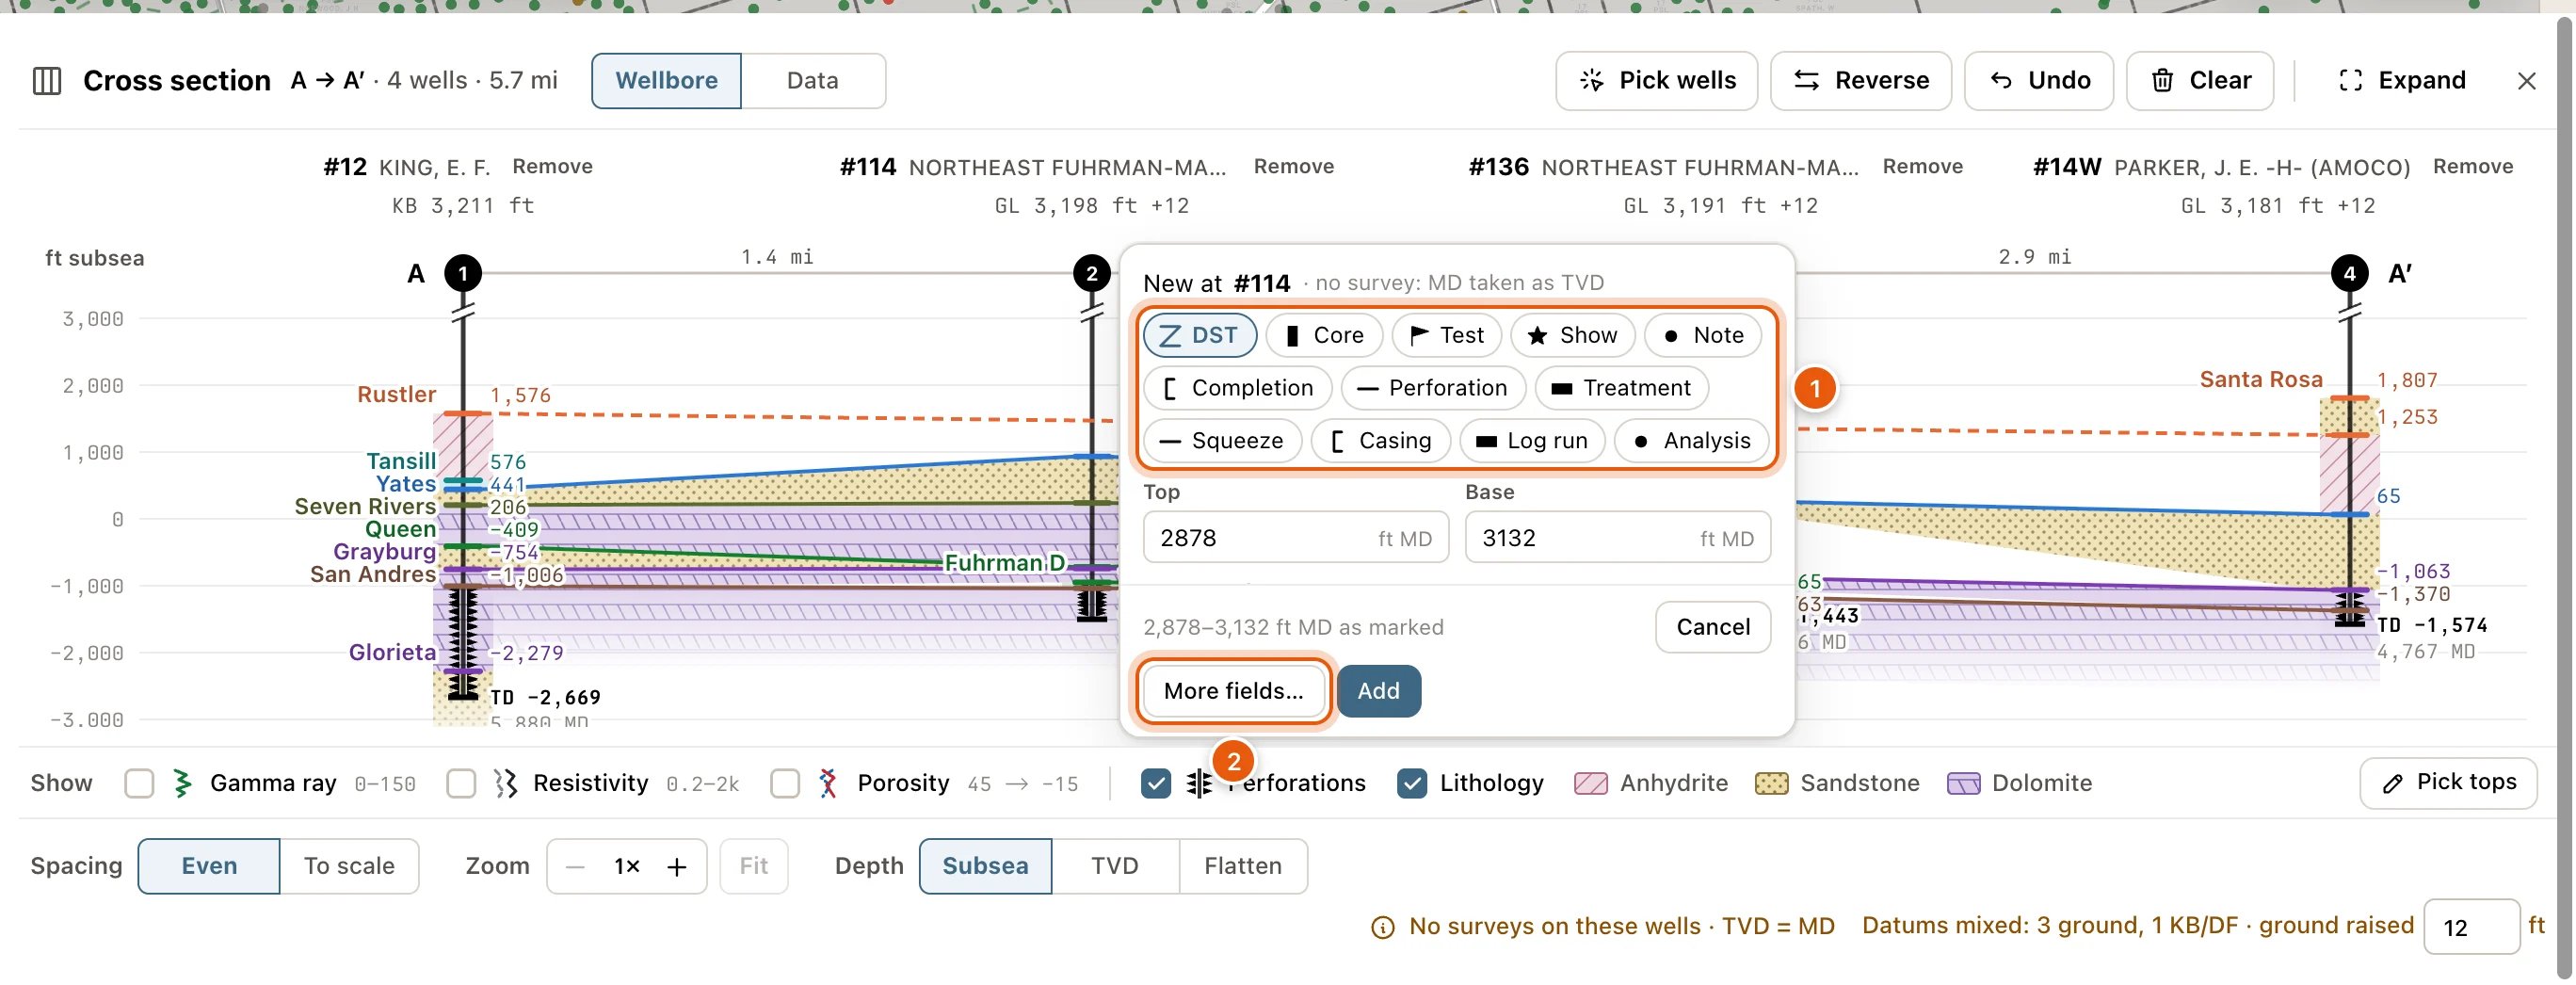
The wells’ records are marked beside their bores at their depths: drill-stem tests, cores, tests, shows, notes, casing strings, log runs and the rest. A perforation record is drawn as the bore’s perforation triangles, and a record with no depth isn’t drawn. Add one right on the section:- Drag down a bore over the range to mark. A click on the bore marks one depth.
- A box opens beside the bore, titled with the well’s number, like New at #303. Choose the kind, such as DST, Core, Test, Show, Perforation or Note, or one your team made.
- Check Top and Base (in ft MD), and fill in the few fields that matter for the kind, such as Recovered for a DST. Add a Note if you like. When the bore shows one of the well’s completions, a perforation, treatment, test or squeeze can be filed Under completion.
- Click Add. The message under the section offers Undo. Cancel closes the box without adding.
What’s kept
Your section is kept for your account and project, so it’s there after a reload and on another computer: its wells and their order, Depth, Wellbore or Data, Spacing, what the Show row shows, and whether the panel was open. Picking wells, picking tops, the depth zoom and Undo’s history last only while Maps is open. The height you raise ground wells by is kept for your account in every project.Troubleshooting
A well says Nothing on file
A well says Nothing on file
QuickScout has no tops, perforations, records or total depth for that well, so there’s nothing to draw. Take it out with Remove beside its name, or add its tops yourself in the tops editor.
A well says No elevation: see it on TVD
A well says No elevation: see it on TVD
The well has no elevation on file, so it can’t be placed below sea level. Choose TVD beside Depth to see it.
A well is left out when I flatten
A well is left out when I flatten
The well has no top for the formation you flattened on, and says No ‹formation› top. Flatten on a formation every well shares, or pick the top in that well.
A horizontal well stops short
A horizontal well stops short
Horizontal, no survey: lateral left off means the well has no directional survey on file, so only its vertical part can be drawn.
Clicking a well on the map opens nothing
Clicking a well on the map opens nothing
The map is still taking clicks for the section. Click Done in the bar at the bottom of the map, or press Esc.
A well says Not read
A well says Not read
The well couldn’t be read just then. Click Retry beside it.